



TARGET:
– quick selection of elements according to the expected criteria
– assigning documents related to individual elements
– creating and saving color versions of the project
COURSE (plugins used): OBJECTS INFO – EXTERNAL DOCUMENTS – GALLERY
1. Open the model to which you will assign technical documents, material cards and reference links.
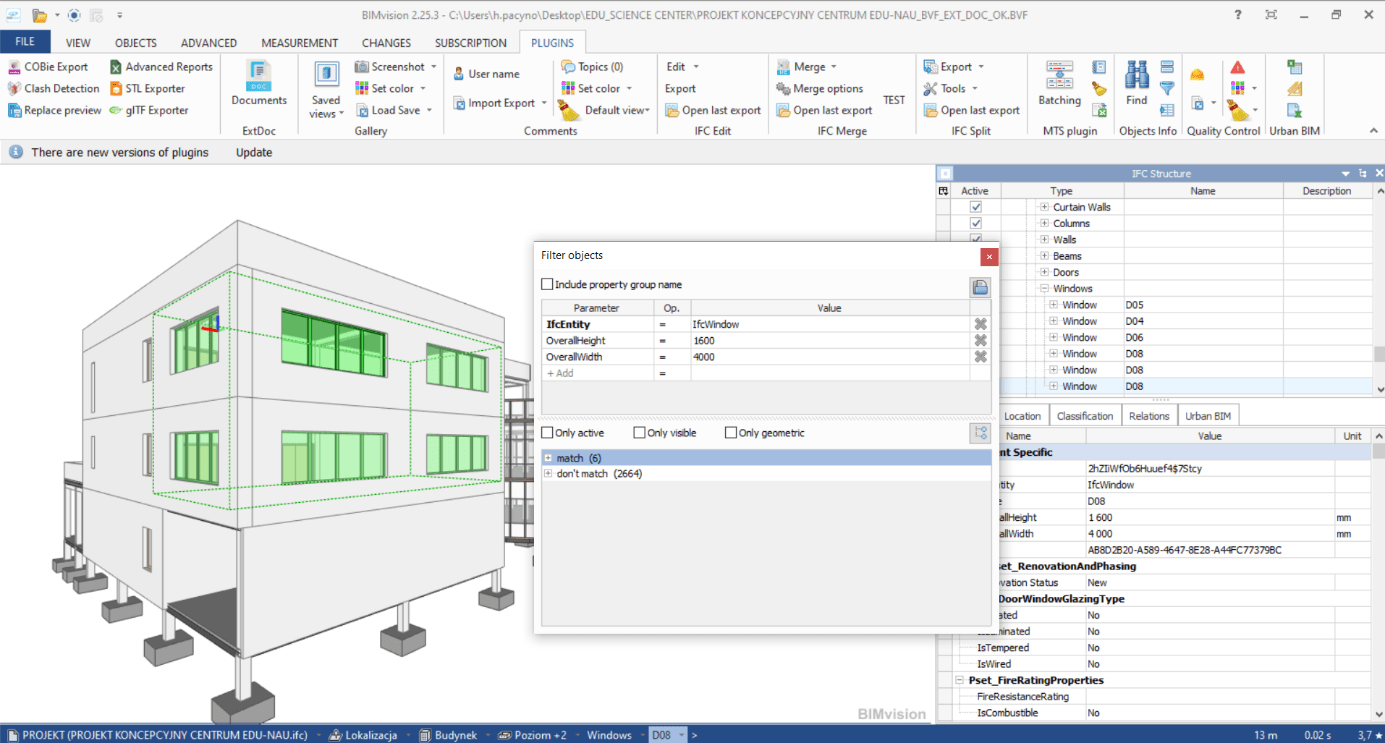
2. Select one type of element. These will be the four-sash windows visible here. In order to find them quickly in the project and select them, they must be filtered by the properties they have in common, but also different from other windows.

3. To do this, first view one such window. Click on it and look at the properties panel. Use the properties: OverallWidth, OverallHeight (that is, width and height) and the classification of the item type ifc.

4. Now go to the Objects Info plugin. Use the “Filter” tool. After clicking the “Filter” icon of the Objects Info plugin, a window will appear.

5. Select the first parameter for filtering the elements included in the project. To do this, click on the empty white box. The list of items with properties will pop up immediately. Select “IfcEntity”.

6. Once you have determined in the left column which property you will filter the objects by, go to the “Value” column on the right. Click on the right side of the box to select the item type ifc from the drop-down list. Note that there is a sign between the two columns denoting the relationship between the property and its value. For an item to be filtered as “matched”, it must be equal to (=) the indicated value.

7. Note that as soon as the first condition is completed, the updated search results will appear at the bottom. You will see that there are 13 objects classified as windows in the project. The rest of the objects have different ifc types.

8. Now add two more properties and fill in their values. Confirm.

9. When this is done, the results will appear at the bottom. The number of project elements that meet the conditions and those that do not meet the conditions will be given in parentheses.
10. Additionally, when you click on an item with the results of matching items, they will turn green in the model view.

11. After clicking on the item and selecting the three windows that meet the conditions, close the Objects Info plugin window and open the External Documents plugin.

12. In the plugin window you can see that the “Selected” option is now active. Click on “Add” to assign the document file to the selected objects.

13. Enter a name and then click the blue icon on the right to select a file on disk.

14. A window will be displayed in which you must select a file.

15. After selecting the file, check the “Save to BVF” option and confirm.

16. With the “Selected” option active, when objects are selected in the model window, you can see the documents assigned to them in the plug-in window. By switching to “All” you will see in the plugin an overview of all documents assigned to elements in the project.

17. Close the window and deselect elements in the model. Now select only one of them. In the property pane on the right you can see the newly added property set – “Documents”. It contains files added according to the names you entered in the plugin window.

18. You can now use the “Filter” tool of the Objects Info plugin again. Search for the next type of windows, doors, partitions and equipment to assign individual documents to them. Continue working as shown above.

19. If your items are grouped, you can quickly select them. By right-clicking on one of the elements and then selecting “Select group” you will select the entire structure.


20. Assign a document.

21. Note that with External Documents, you can also add links to objects. For example, select a wall and assign a link to it to a website with information about the finishing material.

22. By clicking on the document from anywhere (from the plugin window / the properties panel) you will open the document file in the default program available on your computer or in the web browser. * Try to open the attached .pdf, .jpg or link to a website.
23. Now use the Gallery plugin. You can create proposals with it – color versions for an object.
24. Select the elements that you want to give the same color by holding down Ctrl and clicking on individual objects.

25. Slide the storeys apart to add color to the ceilings inside the glass structure as well. To do this, go to the View tab and use the Z slider.

26. By holding down the scroll wheel and moving the mouse you will move the camera view; by holding down the left mouse button and moving the mouse, you will be able to rotate and move the model.

27. Hold down Ctrl and select successive items to be selected together.

28. Assign colors now. To find a specific color, you can search for a RAL color online and then translate it into RGB colors to accurately reproduce the color in the browser.


29. Click on “Set color” and select “Custom color”.
30. Then select “Define custom colors”.

31. When the window expands, select the empty box in the palette on the right for the newly created color.

32. Enter the rgb values or select a color by dragging the eyedropper on the gradient color palette.

33. Click on “Add to Custom Colors” to add the preset color to your color palette. You’ll be able to quickly reuse that color in your project later.

34. Click OK to apply the color.

35. Remember that by sliding the storeys apart, you can quickly restore them to their original places by clicking on the “Reset” button located next to the sliders.


36. Now, apply the same color to the part of the wall above the main entrance. To do this, you must first split the object into two separate elements. Go to the ‘Advanced’ tab and click ‘Add plane’.

37. Then click on the plane of the wall that is parallel to the plane you want to create.

38. Hold down Shift and move the scroll wheel to move the plane back and forth.
39. In the top pane you can also set the stroke (e.g. 1cm or 1m). This is the value by which the plane will move when scrolling. You can also enter the exact offset value manually in the top field.


40. Move the plane to the edge of the curtain wall. Use Shift and scroll. Initially, use a stroke of 1m; when you approach the contact point, change the stroke to 1cm to adjust the position of the plane.

41. Select the object to be split. At this point, the options that can be used are activated.

42. Cut the wall into parts by clicking on “Split objects”.

43. Click on an element to check whether the action has been performed. You can see that the selection now covers only the separated fragment, which is OK.

44. Unclick the selection by clicking on an empty space outside the model. Move the plane again – this time towards the second vertex.
45. To see the model further away, move the scroll wheel; to move the plane – use Shift + Scroll.

46. Select the wall you want to split again and press “Split objects”. Once you have made the split, you can delete the cutting planes with “Clear All”.


47. Now select a split wall fragment, the color of which is to be changed. Go to the “Plugins” tab and select “Custom color” again in the Gallery Plugin.

48. The previously created color is already saved in the palette. Select it and confirm with OK.

49. Then apply the color to the side walls, and then save the view to the gallery.

50. Set the view of the model – by rotating it with the mouse: click and move the mouse / press the scroll button and move the mouse / scroll forwards and backwards.
51. When you are satisfied with the model representation, click “Saved views” and then “Add view”.

52. The view will be saved in the gallery.

53. Save the entire file as .bvf

54. Create a few more views – color versions. To be able to quickly restore the default colors and start applying colors again – go to the “View” tab and select “Restore default colors”.


55. After setting a new color version, add it as a new view to the gallery (Add view).
56. You can use the structure browser displayed on the right to select and change all elements of one type. Change its display from “IFC Structures” to “Types”.

57. By clicking on a branch with a selected type, you will select all elements of that type in the model.

58. You can apply colors with transparency.


59. Once you have created and saved different views in the gallery, you will be able to assign categories to them and describe them additionally. You can of course do this while creating new individual views.
60. Click on „Saved views”.

61. Go to the first color version by clicking on the selected view image.


62. Right-click on the view image. This way you will go to “Properties” to give a name and create a category. Here, individual color versions will be the categories.

63. Fill in the individual windows. Also enter a name for the first – new category. When describing subsequent views, you will be able to create new categories or attach views to the previously created ones.

64. By going back to “Saved views” – you will be able to see the new category already. Assign subsequent views to separate categories.


65. In the properties of the next view, you can select an existing category (existing categories will be displayed in the list) or enter the name of a new category.


66. Assign categories to views and then save the file. After closing the file and reopening it, you will have views saved in the Gallery plugin (Saved views).

67. Click on the image to bring it up in the model space view.

68. You can change the recalled view and then replace it using the “Replace” option available under the right mouse button. You can also add another view to the same category.

69. You can save a .gallery file so that you can reload it into a .bvf file later. You can create many different .gallery files that can store different types of information. One of them can store, for example, finishing concepts. Another may store views with different stages of work or with different categories of objects, e.g. for quantitative calculations.

70. To load the selected .gallery file, simply use the “Load” option and select the file.

71.* Attention! If you are not splitting the elements using the cutting planes, you can save the .gallery file separately and load it directly by opening the original IFC file.